Grid connected homebrew wind turbines

In response to a comment from Michael Jones I am posting a brief note about grid connection of homebrew wind turbines of my Recipe designs.

The turbine output voltage depends on both the rpm and number of turns in the coils.  It increases in exact proportion to both the number of turns and the speed of rotation.  For battery chargers we must wind coils that produce 12,24 or 48 volts at the desired blade rpm.  For grid connection we need to base our coil design on the input DC voltage range offered by the grid-connect inverter.

I do not recommend using a battery based system for grid connection in Europe (although you can do it with a ‘Sunny Island’ inverter).  In North America the Outback is worth looking at.  But think hard before you buy into a battery-based grid-tie system. It shares the worst features of both battery systems and grid systems.  The best way to connect to the grid is usually without batteries.

I have offered suggestions for turns per coil and wire sizes for grid connected turbines using WindyBoy inverters sizes on page 36 of the Recipe Book.  But I have never personally built a grid tied turbine on my own, because I live off-grid.  I do understand the principles well, and I have helped many others to do it successfully.  The people who have most hands on experience with work on my Recipe machines are Ti’eole in France.  See also this post if you are building a 4200 diameter turbine.

The main difference between a grid connected inverter (such as the Windy Boy or the Aurora) and a battery is that the inverter can accept a wide range of (often rather high) DC voltages that you can program in advance, whereas a battery works at a lower DC voltage that is arbitrarily fixed at a level that depends on its state of charge.  Often the relatively constant battery voltage is not the ideal level for the wind turbine to be producing power at over a wide range of different windspeeds.  It can be a bit like driving a car in the wrong gear.  It may struggle or stall.  With an inverter you can shift gears.
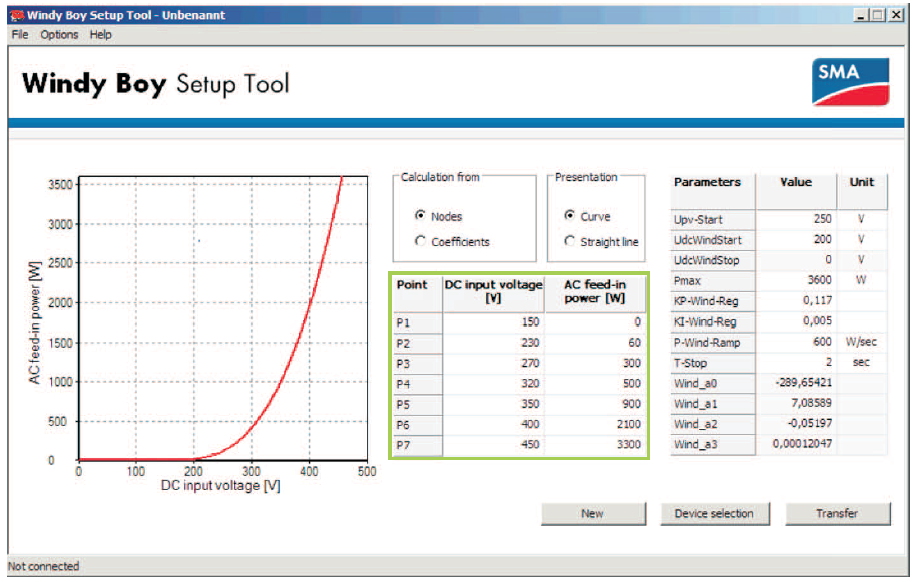
The exact input voltage of an inverter can be programmed as a function of Watts using interface software, such as the above SMA program.  Often this will be done by your supplier, but anyone can do it with a PC and a service cable.  The idea is to set a voltage level for each power level (windspeed) that will achieve the correct rpm in the alternator to load the blades at their best tip speed ratio.  I can offer help with choosing the best inverter settings based on your stator details.  I can also supply inverters, and arrange for programming.

Not only are the blades run at their best speed by the inverter, but the alternator can handle much higher peak power outputs compared with a battery charging alternator setup.  This is because the alternator now works over a range of voltages.  Wind turbines can only produce a relatively low voltage at low rpm, but the voltage naturally increases with speed so that the required current is relatively low in strong winds.

The downside of working at high and variable voltages is that the turbine becomes a significant hazard to the inverter and to humans.  If the inverter is not drawing current off the alternator then the blades will be unloaded and will overspeed, producing dangerously high voltages.  You will need a ‘voltage clamp’ or ‘protection box’ that connects the turbine to a heater when the voltage reaches a certain level where it threatens to damage the inverter.  The voltage clamp works very like a diversion load controller on a battery system.  It diverts current into heat, sufficient to prevent voltage rise above a set level.  It relies on a large bank of capacitors. The inverter probably provides the capacitors, and should also be kept connected for this reason.
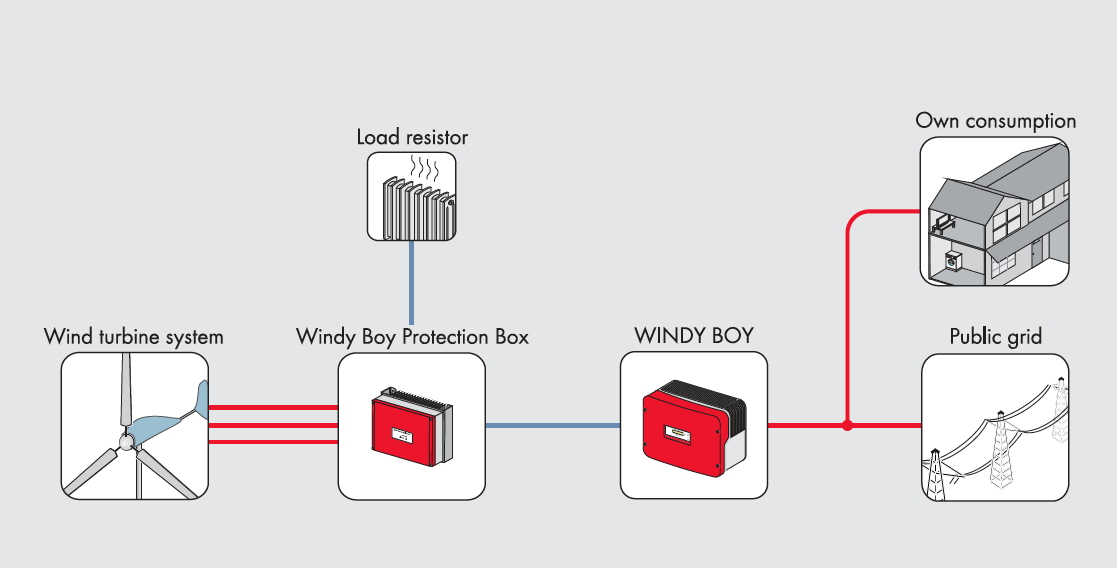
Actually the protection box makes the wind turbine into a heating turbine that can also feed power to the grid.  You really need that heating controller as a backup, since the grid is not a reliable load.  But if all you wanted to do were to run heaters, you would probably choose a different setting on the heating control box so that it would come into action at lower voltage and run the blades more slowly.

Another additional safety option that makes sense to have is an over-voltage trip. This is a circuit that connects a big dump load (or even a short circuit) to the turbine if the voltage exceeds a given limit. In case the other circuits fail …

It’s wise the treat the wiring with respect too and makes sure there is good insulation and no chance of wires scuffing themselves on bare metal in the tower for example.  This is a lethal voltage source and there is no means to wire in protection against faults.

Other electronic equipment is available out there.  I have used Solar Converter’s LDR controllers for both nverter protection and for heating systems.  Smaller systems are often based on Windmaster 500 inverters working at 50-100 volts.


Posted in construction, products/technical, wind systems tutorial | 13 Comments

Chain driven turbine with Classic controller

Chris Olsen’s latest project involves a Classic 150 controller connected to an alternator that is gear driven from 3.2m diameter blades.  The gear ratio is 1:2.5 up ratio.

It’s a single-stator with 3-phase star connected windings this time.  The ferrite magnets (16 of them at 50 x 50 mm) are crammed close together.  This reduces the moment of inertia and also allows short turns on the coils which reduces overall resistance.  Chris could have put a lot more copper into the stator but actually the loading to max out the Classic is only 30 amps (at 100 volts) so he decided that it was efficient enough already.

The big advantage of the Classic controller is that it allow the alternator to work at variable voltage while charging a battery at relatively constant ’24 volts’.  By programming the Classic, Chris can keep the tip speed ratio at 6 over a wide range of windspeeds.  At the same time the alternator voltage rises in stronger winds, reducing the current in the coils which makes the alternator more efficient.  It’s a win/win situation with an MPPT controller (so long as it doesn’t blow up 🙂 ).

The stator ended up 10.5 mm thick wound with 45 turns of 13 AWG wire.  It produces 119.1 volts @ 1,000 rpm with an 18.5 mm air gap. The voltage is about 80% of what I would normally see with a larger hole in the coils, and more widely spaced magnets, but the compact style of construction has potential for much reduced resistance.

Resistance of the star-connected stator is .55 ohm.  Losses at 30 amps should therefore be around 500 watts for a 3 kW output.  That’s a hot stator but safe with good cooling.  I calculate the power dissipation on the surface of the coils to be around 0.5 watts/sqcm (6W/sqinch).

Gear ratio is .4 to 1 (or 2.5 times up-ratio) so it can produce battery voltage at about 100 rpm on the blades – nice for low windspeed cut-in.

here is a video of the turbine mechanical stuff part assembled

The whole story is here.

Posted in construction, ferrite magnets | 5 Comments

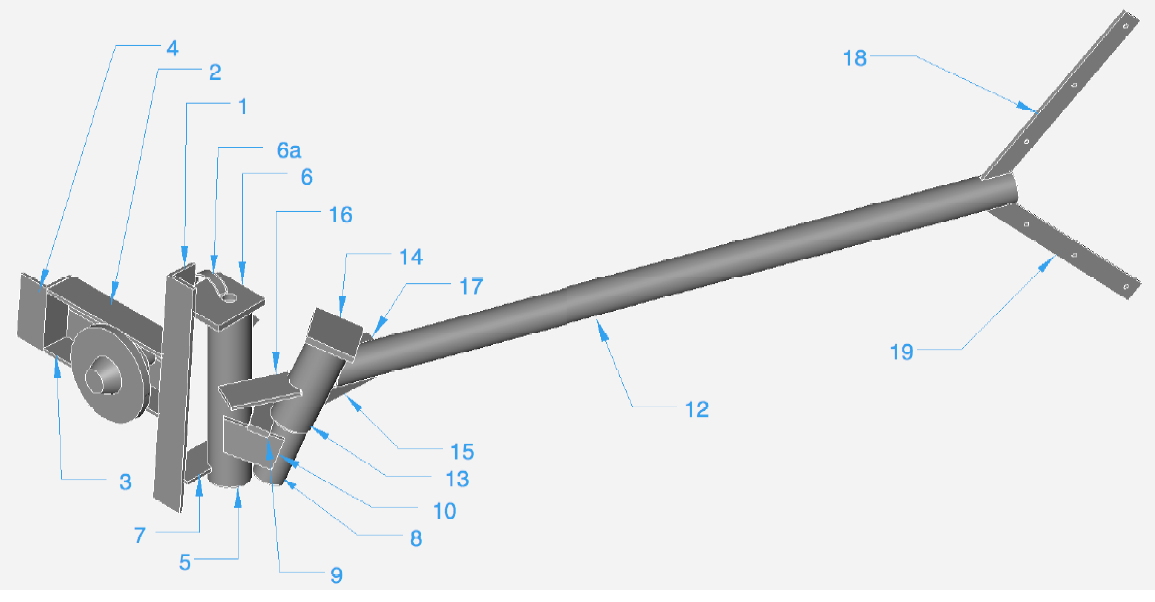
Step by step guide to welding a 2400 mm diameter Recipe turbine

About 6 months ago I prepared a 12 page document with some step by step drawings and  instructions for welding together the steel frame for just one of the wind turbines in my Recipe book.

You can download it by clicking on the paragraph above.  My Recipe Book has been updated enough, and I don’t want to make it bigger, and in any case I don’t have time to spell out this much detail for each of the six sizes, in both metric and ‘english’ units of measure.  So I offer this as a supplement to those of you who choose the build machines of this specific size (an old favourite), and also as a source of ideas and clarification for people working on the other projects in the book.


The drawings show the actual length of each piece of metal, so you don’t have to look them up in a table amidst all the other sizes of turbine.  I’ve also put in a couple of new hints and different ways to do stuff.

As ever I have been driven by trying to make the task as simple and cheap as possible whilst being strong and reliable.  Of course there are any number of other ways to put it together using materials that you may have to hand, but this is based on a mimimal range of very standard steel sections.

Have fun, and feel free to send me comments and questions as always.


Posted in Books, construction, my own projects, Scoraig | 6 Comments

Next year in Washington state

I’ll be teaching a “Homebuilt Wind Turbines” workshop course for Solar energy International on Guemes Island WA next October 15-20th 2012.

This will be the sixth event of this name.  You can find some photo diaries and videos of previous workshops here.

Posted in construction, courses, Notices, Video links | 3 Comments

Ampair require 3-5 engineering apprentices

JOB VACANCY

Ampair is recruiting 3-5 apprentices to join an expanding renewable energy manufacturing business.

This role is as electromechanical production engineering apprentice manufacturing components and assemblies for small to medium sized wind & hydro turbine systems, and electrical equipment.

The place of work will be in a light industrial unit in Dorset, in the village of Milborne St Andrew, which is 30-minutes from Poole, and 15-minutes from Dorchester and Blandford.

Posted in Notices, People, UK small wind scene | Leave a comment

Wiring up a 12-volt stator

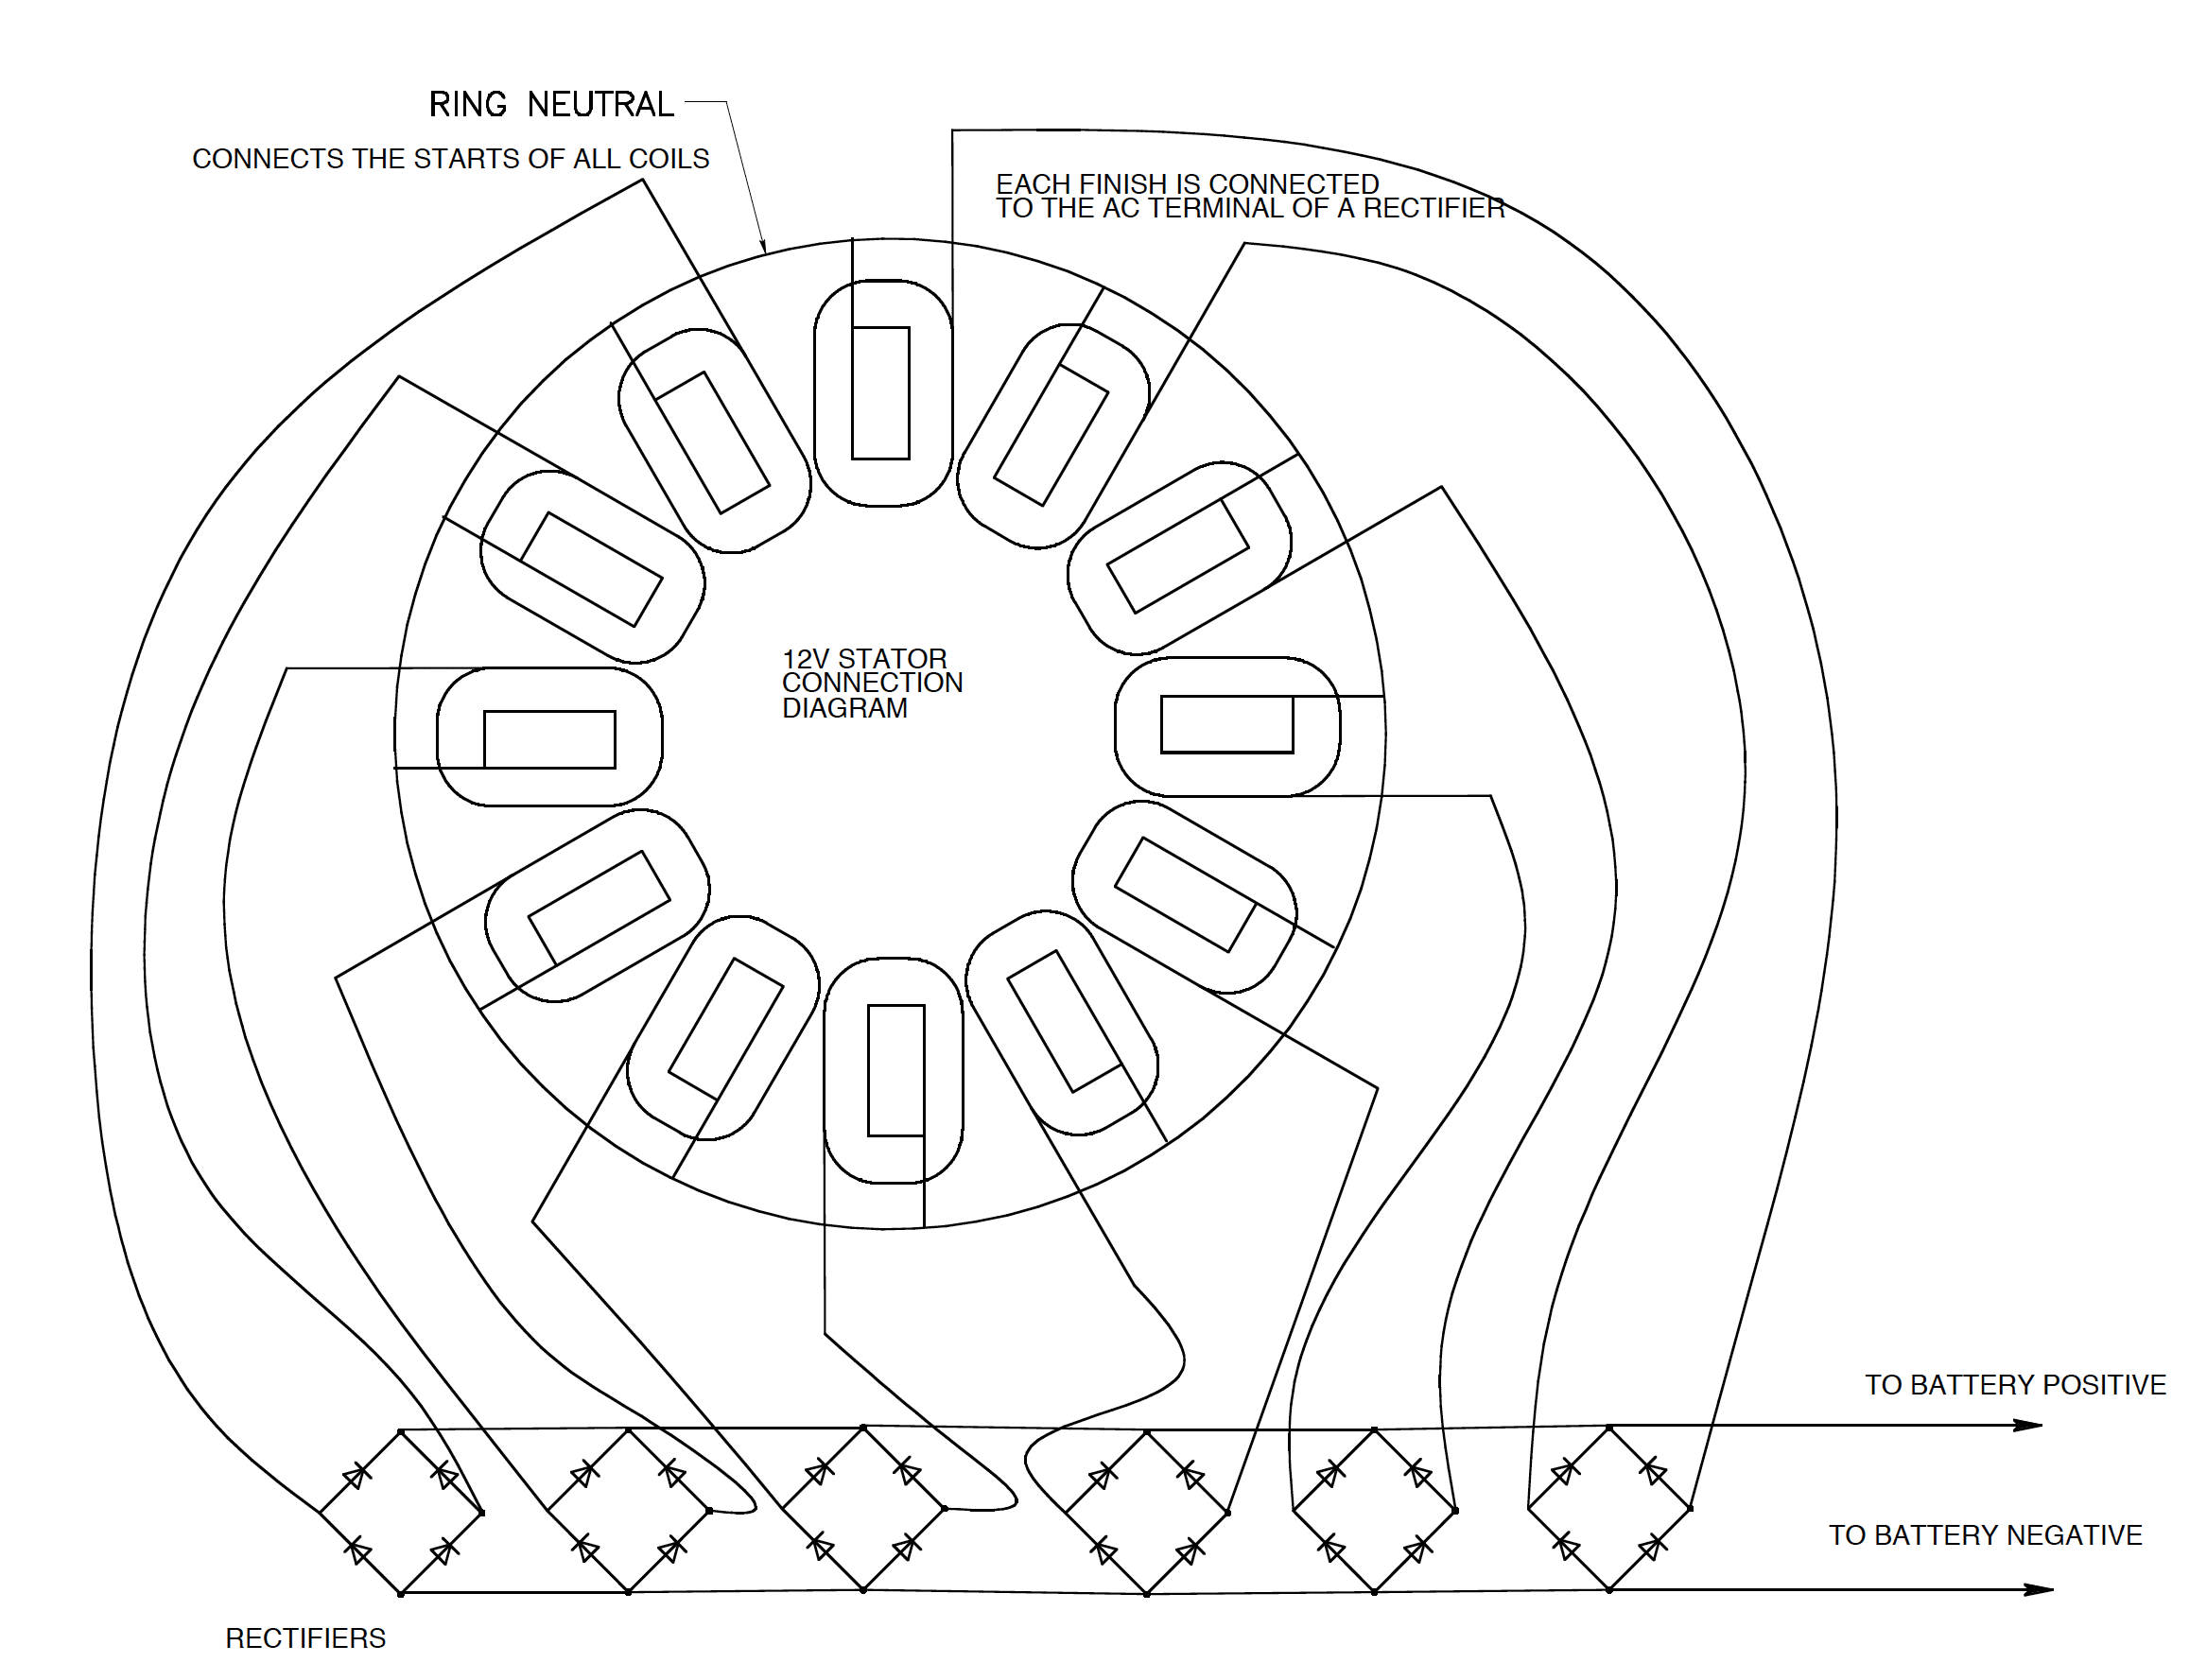
In order to reduce the size and stiffness and number of wires that are needed to wind each coil, I prefer to connect the coils of a 12-volt stator in parallel rather than in series.  This means each coil has more turns of thinner wire to achieve the correct voltage at the desired speed.

We could simply connect all of the coils in each phase together in parallel, but the reality is that they will produce a slightly different output signal (in voltage and in phase/timing) which would lead to some parasitic currents between the coils.

For this reason I prefer to rectify each coil separately.  The rectifier diodes block any mutual currents.  Connect in parallel the outputs of all the rectifiers, using DC buses, positive and negative, which conduct the current to the battery.

I start by connecting all of the ‘starts’ of each of the coils together using a ring of wire.  This ring can also be made tight enough to hold the coils in position against the island in the stator mould.

Next I connect a tail of flexible wire to the finish of each coil and lead it out to the rectifier box.  The rectifiers are usually single phase because they are cheaper to buy.  But it does not matter at all which wire goes to which rectifier unit.  Each coil finish just has to be connected to the AC terminal of one of the rectifiers.

Posted in construction | 50 Comments

New structure for research and development is launched at WindEmpowerment

Piet has created a procedure for refining and defining research goals and methods in a collaborative environment on the WindEmpowerment website.

intro_movie_we from piet Willem Chevalier on Vimeo.

Posted in Notices, Video links | Leave a comment

Gordon Proven

I’d like to remember Gordon Proven, the brilliant inventor, and creator of Proven Energy.  I only seem to have this one photo of Gordon from the early 1990s in his old factory in Kilmarnock. 


Gordon built a really heavy duty wind turbine that can outlast all the others.  Here is a photo of one of his first efforts, more than twenty years ago.

At that time he used a geared induction motor, but he did some research into permanent magnet alternators and adopted a very good toroidal design that has served well to this day.  His blade pitch control system is unique.

Gordon Proven passed away peacefully on Saturday, at home and with the family beside him.   He had been living with motor neurone disease for more than 5 years, and still fighting to the end.  I have fond memories of his ingenuity, generosity and humour.

Posted in People, UK small wind scene | 16 Comments

Heat pump book

John Cantor has been around heat pumps a while, so what he has to say is going to be worth looking at if you want to understand the subject.

Heat Pumps for the Home. Author John Cantor Illustrator Gavin Harper

Crowood Press ISBN 9781847972927 cover price £14.99 128 pages, 155 colour photographs and diagrams Release date – end of October 2011

Heat pumps are surprising devices that can extract heat energy from something that appears to be cold – from the air or the ground for example – and ‘magically’ use it for home heating. This concept is somewhat perplexing and goes counter to our natural sense of how things ought to work, so it is not surprising that some people wonder if heat pumps really do what they claim. There is, after all, no shortage of gadgets that fail to do what they say on the box! In this book we want to give you the whole picture, warts and all. Like any other technology, heat pumps can perform poorly if badly installed or used for the wrong purposes and we cannot expect them always to match the exaggerated promises of salesmen. But the basics are straightforward. The science is completely sound. The engineering principles are well established. And we know from hands-on experience that heat pumps will deliver low heating bills if they are installed properly. This book aims to demystify a subject clouded in hype and misunderstanding. The book starts at first principles, so prior knowledge is not needed, but is also aimed at anyone who wants to improve their understanding of modern heat pumps, such as householders, planners, plumbers, students or architects. It is also devoid of sales hype and spin, so offers a balanced view. Armed with the content of this book, the informed homeowner or designer should be able to judge whether a heat pump installation might be appropriate in a given situation (or not), and how its performance might be optimised. Why buy this book? Given that heating is expensive, and probably a considerable ‘chunk’ of one’s income, the cost of this book is tiny by comparison. It could help you to avoid installing an inappropriate system – potentially a very expensive mistake. It might help you get a good system running even better.

Posted in Books, Notices, People | 2 Comments

Paul on Raasay gets his Powerspout spinning

After sorting out a few wee leaks (at 6 bar pressure), Paul Camilli has got his Powerspout turbine running sweetly.


I love Paul’s blog.  Especially when it’s about hydro turbines but I love it anyway due to the photos and stories every day.

Posted in People, Video links | Leave a comment