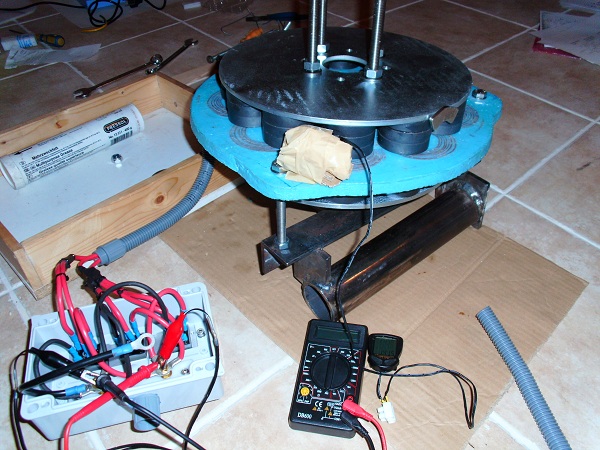
Pedro Bernardo has been sending me photos of his latest project using ferrite magnets from a microwave oven. Pedro lives in a village close to a small city called Marinha Grande, Portugal. (Since I first posted this message he has put all of these details on the Fieldlines discussion board.)
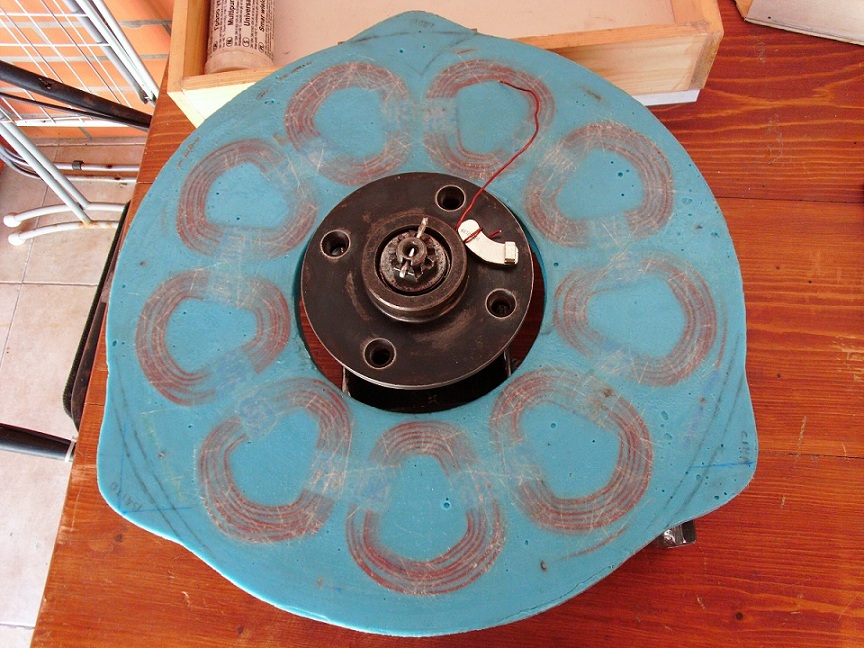
Stator with 9 coils (2 x 1.6mm wires) 46 turns, connection star/series, 13mm thick.
 The generator had two 6mm disks, 12 magnets each (microwave magnets in pairs at first), diameter 306mm.
 The idea is to reach 12 volts close to 200 rpm, and use the recipe book 2400 mm rotor. Bench testing showed a 12V cut-in rpm closer to 226 rpm. Pedro then stacked on a third magnet level on each rotor and got the cut-in rpm down to 215 rpm.
 According to my calculations this alternator should be comfortable at a power output around 400 watts with 40% efficiency. This is compared with the neodymium version producing 700 watts with 70% efficiency.
However the magnets are much cheaper, and very durable. Also the alternator speed characteristic is much more suitable for the blades. The higher internal resistance of this stator helps to push the speed up as the windspeed increases, thus preventing stall.
I trust that Pedro will secure the magnets against flying away!


Hi, I liked your project very much. Mainly because it dont left dependency from the expensive chinese neodimium magnects!
Inspiring! Great job! Can speaker magnets work?
Yes I should think so. YOu will need to find a few of them.
Hugh
Sir which size of speaker magnets use for this turbine
Is it possible to get 2000 watts from it by spinning 1000 rpm?
Hi, i have ring magnets just like these too(50mm diameterx10mm at side) and i have been doing a lot of testing with it. They seem to produce more current when the sides are facing the coil. Its good to know that it works this way too.
Hi Hugh,
Link at the top 404’s for me. Think the www is neccessary for some reason but the one you’ve posted in comments works fine.
http://imgur.com/8ry4Mp5
Best regards
James
ok thanks I think that is fixed now.
Thank you very much for your advice, I will surely try it.
I have recently been working on my turbine and the resultsare excellent. However I am unable to load the photos here. My question is does the length of the arms of the blades have a calculation?.Mine are About 30cm long and the blades are 38cm deep . Would I get more torque or power by lengthening the arms by a few more cm’s as I live in an area of poor wind.The machine itself is well built and very sensitive to wind.Mamy thanks.
hi George,
I am not sure what the arms of the blades are in fact. Maybe you need to send me an email with photos.
The torque depends on the cube of the blade length. Power depends on the square of the blade length. speed is inversely proportional to blade length.
cheers, Hugh
George I am also have low wind area give me data and detail of your turbine and axial flux I am also want to make for my area
Pedro how are you , I need some help. I have a washing machine motor E113 MODEL C68PXEPF-3665 and I would love to use it as a motor for a windmill but the problem Is, I do not know how to wire it to get it to spin. it is out of the machine, and I do not have the machine. it has 6 wire. starting from right to left black,purple white with black spripe,sky blue yellow white.
HI, DO NOT SEEM AN ENGINE WASHING MACHINE FOR A GOOD WIND TURBINE, UNLESS THAT ENGINE HAS PERMANENT MAGNETS, THE ENGINES IN SOME MACHINES, JUST LG AND F&P, CAN BE CONVERTET YOU CAN CHECK THE SITE http://WWW.thebackshed.com, SHOULD GIVE MORE WORK TO CONVERT ONE OF THESE ENGINES MODEL TO BUILD A HUGH MODEL, IF YOU DO A FERRITE ONE´S ITS CHEAPEST.
I GET SOME FERRITE MAGNETS FOR FREE FROM DAMAGED MICROWAVE OVEN.
YOU CAN ALSO BUILD ONE WITH NEO MAGNETS FROM COMPUTER HARD DRIVES, BUT YOU WILL REALLY NEED A LOT OF THEN.
REGARDS
Hi Pedro, I was hoping to really use the washer motor, but I guess I will just of to put it aside. However, I saw your mirowave magnet windmill and I was facinated by it and started to collect microwave magnet. I have collected so far over 90 pieces but I am short on coil wire. Maybe I could use the coil from the washer motor. I think Iwill try that. thanks much for your advice.
Hi Peter, if you use the same design, (2400mm rotor Hugh design) you will need 48 identical magnets, they are not identical,
you can put it in pairs, 12 pairs for each rotor, you just need a few more turns of wire than my windmill, and it will be much heavier.
for 12v system 53 turns(1,5mm wire and two in hand)
for 24v system 106 turns(1,5mm wire)
and with the same design of colis
with this stator design you can get a CUT around the 200RPM.
Hope this can help
regards
I am sorry Peter but you do have to tell me what design you are referring to. Please when you ask questions give as much information as possible so I can understand what you want.
You can see the spacing of pedro’s magnets in the photos above.
If you want to use a 400 mm disk then you need to tell me what size magnets you have available. I’d crowd them in if possible but they have to come in pairs. I don’t mind if the magnets touch each other.
Am talking about spacing between the ferrite magnets (in mm).
hi Peter,
the project in this post has magnet disks 306mm diameter. I would use a small truck wheelbearing for a 400 mm disk. I use that size for 3.6 metre machines with neo and for 3 metre machines with ferrite magnets.
Spacing depends on the design and it’s not clear what you are referring to.
Hugh, is the old volvo hub suitable for a 400mm disk rotor and also what is the spacing between the magnets?
Hi Hugh,
I tested this wind gen last day, I use a amp meter, battery and a rpm counter,
I tested it turned by and, only can do 300 rpm and can read at amp meter 6 amps, and in open circuit 16 volts at same 300 rpm.
regards
Pedro
Thank you very much for the layout of the wiring from the stator to the inverter, I appreciate it very much. I pray that God will bless you abundantly for all those valuable information you are giving to individuals across the world. I have seen the animated movement of the magnet passing over the coil and I love it. I would like to see how the microwave magnets passes over the coil, knowing that the magnet has a whole in the middle. Thank very much.
Hello Hugh.I have a question.Do the magnet plates have to be metal or could I use a metal cutting grinder disc? Also does throwing in metal pieces inside the coils help efficiency at all?
Many thanks in advance.
The plates have to be steel (or iron). Other metals or materials will not work so well. The magnets are like batteries in a circuit. The steel disks are like the wires to carry the current from the battery. If you don’t have steel disks then the magnets have to work hard to push their magnetic flux across the gap between their backs and so the flux will be weak.
Putting steel inside the coils would make the flux stronger still, but there would be problems with doing that. You would create vibration and heat in the stator. The alternator would be difficult to start turning. The magnets would be drawn to the pieces of steel in the coils.
Hugh
Prodro, I thank you very much for the way you have explain the way the coils are connected. I have never seen it so clearly. The next step that I would be very appreciative of is the connection of all the parts and wiring necessary from the stator wire to the inverter. Please, give it in detail as you have done with the coils connections, thank very much.
Hi I think you will find the diagram that you need on this page
http://scoraigwind.co.uk/installing-and-configuring-a-tristar-controller-for-a-wind-system/
Hello Hugh, i saw the animation you posted in the link above, it’s just awesome, i’ve never seen it explained or made that simple on any other website. I really appreciate the great job you are doing. Thanks a million times.
Merry Christmas Hugh. I found it here http://scoraigwind.co.uk/wp-content/uploads/2012/06/magnets-and-coils.jpg . I really appreciate you for the concern you’ve shown. Thanks alot.
Ok, sorry for my english. I mean how are the 12 magnets distributed among each of the 9 coil; 12 magnets (even number) and 9 coils (odd), how many magnets will you have crossing each coil at a time, am reall stuck here. Maybe an illustrative diagram will be very useful. Thanks
I put an animated diagram on my blog here.
http://scoraigwind.co.uk/2012/12/3-phase-stator-visualisation/
I hope this helps
Hugh
Pls what is magnet to coil alignment ratio? Am copying this design but with 24 of these magnets (12 on each rotor). Neo magnets are too expensive. Am also thinking of experimenting with 6 or 8 coil stator but with more wire turns.
Sorry peter but I don’t understand the terms. What is the alignment ratio? In this case there are 9 coils/stator for 12 magnets/rotor and this produces 3-phase output. But it says that at the top already, so I don’t know what you are asking me.
Hugh
I would like to see in detail how Pedro prepare the coil meaning how much winding is on each roll of coil, the size of the hole in the coil and how he connect each roll of coil.
Stator with 9 coils (2 x 1.6mm wires) 46 turns, connection star/series, 13mm thick.
well done sir. great job.
sir please tell me witch awg wire you have use.i can’t understand 13mm. please tell me according to standard wire gauge. thanks
Hi
The wire is 1.6 mm diameter (european size) which is 14 gage in american language. I am not sure who uses SWG any more but you can find conversion tables on the web using google.
The stator is 13mm thick which is 1/2 inch thick in USA speak.
cheers
Hugh
sir bundle of thanks. for reply in details.
sir my another question. sir tell me this generator how much amps will produce ?
sir i want to make this generator . so please tell me how much amps will produce this generator ?
thanks.
hi amraiz,
If you read it you will find that it can do 400 watts which would be 400/12 = 33 amps or so.
Coil dimensions are given at the link provided in the post http://www.fieldlines.com/index.php/topic,145661.0.html
Hugh
and sir please tell me this one also that coil size is ?
i want to say length and width of coil is ?
i am waiting your kindness.
thanks.
sir bundle of thanks. for reply in details.
i shall try to make as like this.
thanks
sir please tell me what is the formula to calculate each coil turns ?
for example I want to built this generator as you but my required volts are 11v. total 9 coils. so how much each coil will need turns. ?
how I calculate each coil turns ?
please sir tell me.
thanks.
hi
The design is 46 turns for charging a 12 volt battery. I have no idea what you plan to do with 11 volts but you can use fewer turns for that and possibly you can fit larger wire size but probably not.
You can calculate the effect of changing the number of coils turns easily. The voltage is proportional to the number of coil turns (if speed is constant). If you want to change from 12 to 11 then you should use 46 x 11/12 = 42 turns.
Have fun
Hugh
ok. thanks sir. actually when i charge my battery by 12v and 15 amp then battery charged fully but no gravity. so i think if i charge battery by 11v 15amp then may be my battery will get 12.5 gravity. so i think.
i have change 3 battery but no good result. so that why i want to charge my battery with 11v and
15 amp.
thanks sir.
ok sorry but you do not understand how this all works.
The voltage is mostly controlled by the battery, but when you charge it the battery voltage will rise. You need to charge the battery until the voltage reaches around 14-15 volts depending on the type of battery exactly. Keep it at that voltage for several hours and you will get good specific gravity.
The turbine voltage will simply follow the battery voltage. So it’s more like the battery controls the voltage, that controls the speed of the turbine (rpm) via the number of turns per coil. If the speed is wrong for the blades then you need to change the number of turns per coil or move the magnets closer or away to adjust the speed. when you get the right amount of wind and the speed is right then your batteries will charge up and their voltage will rise and the speed will also rise but that should be OK we hope. Blades like higher speed in stronger winds.
I hope this helps
Hugh
Hey its good to see some thing non-Neo as they are going way high in price. What are the dimensions of these magnets used?
Pedro told me: “the size of them are 57mm diameter and 13mm from side, they have a hole in the middle with 22mm of diameter”
Hugh
Your article very much. I re-read a new post.